Apple CEO Steve Jobs revealed during the recent Apple media event that iOS 4.1 would add a new feature to the iPhone 4: high dynamic range photography. The technique has been widely used to create often dramatic images of landscapes, scenery, and still lifes using digital cameras. In fact, several apps already exist for doing HDR photography with an iPhone.
But what's so great about HDR photography? And is Apple's new HDR feature any good? Ars dug in to find out.
High dynamic what?
High dynamic range photography, as it is commonly used today, is an attempt to compensate for the limited dynamic range of most digital imaging sensors. The dynamic range of any image is a range of brightness levels from the darkest darks to the lightest lights—the range of tones than can be represented all at once. Many scenes have a much wider range of tones than can be captured in a single exposure, even with the most advanced DSLR.
In particular, outdoor scenes in bright daylight often have far more range from the shadow areas to the brightest highlights than a digital camera can capture. If a camera's exposure is set for the shadows, highlights may become "blown-out" white blobs with no detail. Conversely, if a camera's exposure is set to give detail in the highlight areas, shadows become large black masses.
(Dynamic range concerns aren't limited to digital still cameras; it also applies to video, audio, or any time analog information is converted into digital form.)
HDR photos instead combine multiple images of the same scene—a minimum of three, but often more—each with different exposure settings. Early HDR photographs were carefully composited in Photoshop using complex masks and various blending modes to create an image with a much larger apparent dynamic range than was possible using just one exposure.
These techniques aren't new, however. Black and white photographers in the early part of the last century quickly discovered that film negatives could record far more dynamic range than was possible to reproduce on paper. They used darkroom techniques like dodging and burning, and later, selective local contrast, to extend the apparent dynamic range in finished photos.
As HDR became more popular on the desktop, the mathematics of digital tone mapping were exploited to create automated tools to combine multiple exposures into an HDR image. These same types of automated tools form the basis for iPhone apps like HDR Camera and TrueHDR, as well as iOS 4.1's HDR feature. Such tools require very little effort compared to manual compositing—with iOS 4.1 on the iPhone 4 it's just a matter of tapping a button—but they don't always produce stunning results.
HDR the Apple way
An important consideration is that the new HDR feature in iOS 4.1 only (currently) works with the iPhone 4. It takes advantage of its newer, faster camera hardware as well as the power of the A4 processor to make the feature quick and easy to use. (It doesn't work with the front-facing camera; we suspect that the shutter or something in the processing chain prevents it from working as well as Apple would like.) If you want to make HDR photos with older iPhone models, third-party apps are your only choice.
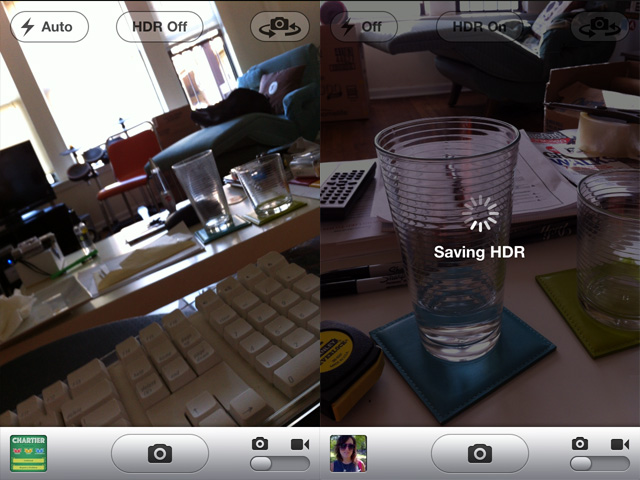
To take an HDR photo using your iPhone 4, just tap the new "HDR On/Off" button that appears at the top of Camera's interface in iOS 4.1. Aim and shoot as you usually would, taking care to remain as still as possible. With the Camera app's direct hardware access, three exposures are taken in rapid succession—one based on the autoexposure setting, one underexposed, and one overexposed. It then takes four to five seconds for the iPhone to process the separate exposures into one image.
By default, the "normally" exposed image is saved to your Camera Roll along with the HDR image, though you can change this by launching the Settings app and tapping on Photos. This feature is quite handy, in our opinion, because in some cases you may actually prefer the non-HDR result.

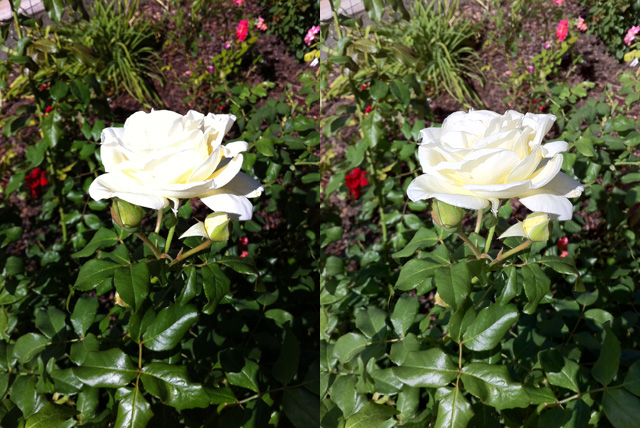
Earlier we said to be as still as possible when shooting HDR images. The iPhone 4 will take the three separate exposures very quickly, especially when bright daylight allows for very short shutter times, but a few attempts to photograph a close-up of a flower that was blowing in the breeze resulted in a blurry mess. And if it's not readily apparent, HDR won't work for action shots. As impressive as HDR results can be, that on/off switch is there for good reason.
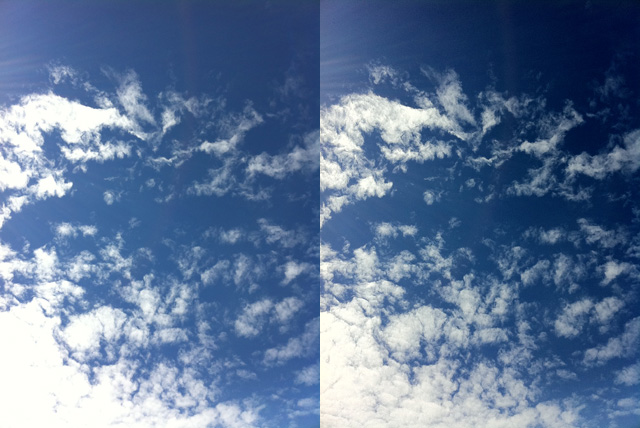
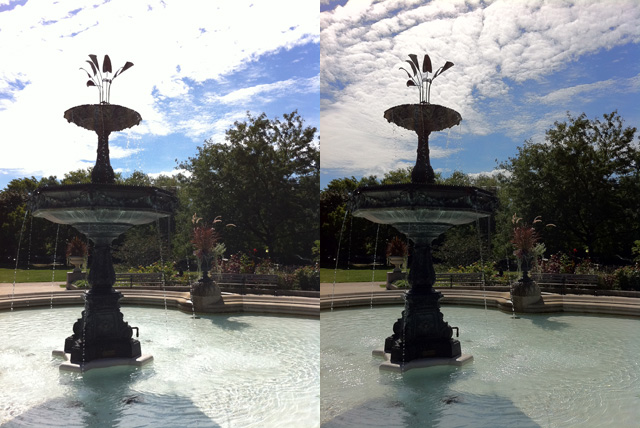
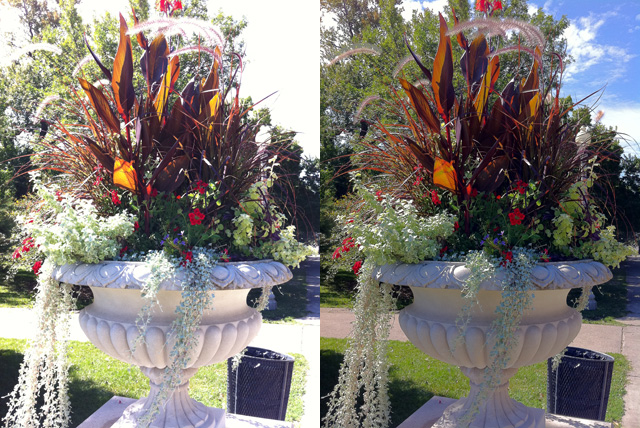
Below are several examples of images shot in bright daylight, with the HDR images on the right. You can see in the normal exposures that highlights are often blown out, especially in clouds, light colored objects surrounded by darker backgrounds, or on reflective surfaces. The HDR images bring back most, if not all, of that detail.
While HDR images bring back lost highlights, they can also bring out more detail in low-light shots or heavily shadowed areas. The example below is somewhat contrived, but it shows the potential of HDR to make better images in tricky indoor lighting. Careful when using HDR late at night in your local watering hole, however—shutter speeds will likely be too slow to get usable results.

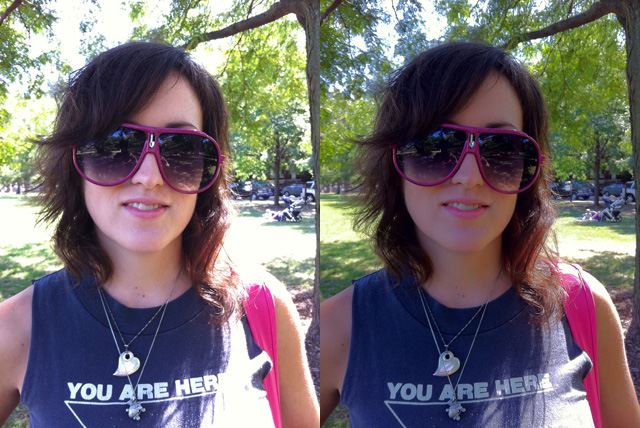
Finally, here's an example where even with the added details, some of the automated tone mapping decisions just don't work aesthetically. Notice how the skin takes on an odd sallowness, and areas that should have some highlight, like the text on Michelle's t-shirt and her otherwise bright white teeth, have been turned into a grey mess.
In all, the new HDR feature is well implemented. It can often overcome the dynamic range limitations of the iPhone 4's camera sensor, particularly in bright light, with zero effort. For completely automated results, it can easily improve an image about five times out of ten. Some HDR images that are only so-so could benefit from some additional tone or contrast adjustments if you're the sort to go through that effort. And the fact that it will automatically save the original and the HDR version means you can always have two images to pick from.
reader comments
145