Mobile Apps
Over 200 million users access Facebook from a mobile device every month. Facebook Platform lets you bring these users and their friends to your mobile apps, creating a more engaging and personalized experience.
Facebook Platform provides SDKs for iOS (iPhone & iPad) and Android. If your mobile app runs on a platform without a Facebook SDK or runs in a mobile browser, you can use our web-based Facebook Login, Platform Dialogs and Graph API directly.
This guide walks you through the basics of creating mobile apps that leverage Facebook Platform. The examples in this guide use Objective-C for iOS, Java for Android and HTML/JavaScript for Mobile Web applications. These examples are very straightforward and easily translatable to other languages.
In this document:
iOS for iPhone/iPad
Before you begin development with the Facebook iOS SDK, you will need to install the iOS dev tools, Git (the source control client we use for this SDK) and then clone the lastest version of the SDK from GitHub:
Install XCode
Install Git
Clone the GitHub repository:
git clone git://github.com/facebook/facebook-ios-sdk.git
Once you have everything installed, open XCode and create a new iOS project. In order to use the iOS Facebook SDK, the source files from that SDK project must be brought into the app project. This can be done a number of different ways, but the easiest way is to just drag the src folder from the local Git repository for the SDK (e.g. ~/facebook-ios-sdk/src) into the app XCode project.
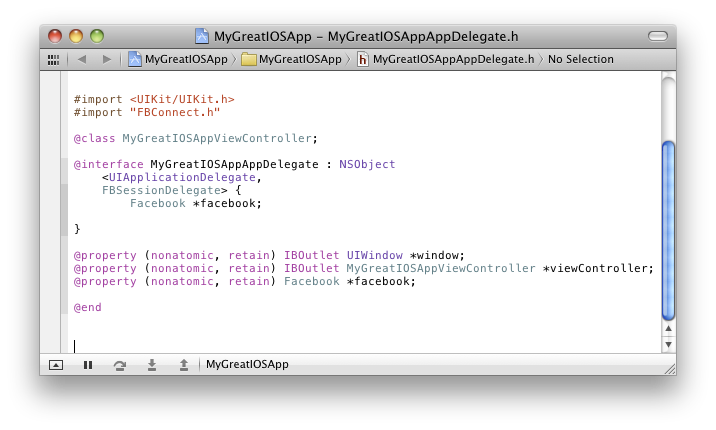
After including the SDK source files into the app project, an #import declaration must be added to a header file to ensure that that the app can reference the SDK types in the app source files:
#import "FBConnect.h"
With this step complete, the Facebook SDK can be built and used within the app XCode project.
Implementing Single-Sign-On (SSO)
One of the most compelling features of the iOS SDK is Single-Sign-On (SSO). SSO lets users sign into your app using their Facebook identity. If they are already signed into the Facebook iOS app on their device they do not have to even type a username and password. Further, because they are signing to your app with their Facebook identity, you can get permission from the user to access to their profile information and social graph.
SSO primarily works by redirecting the user to the facebook app on her device. Since the user is already logged into facebook, they will not need to enter their username and password to identify themselves. They will see the auth dialog with the permissions that your app has asked for and if they allow then they will be redirected to your app with the appropriate access_token.
Adding SSO to your app is very simple with the Facebook SDK. The below example outlines how to configure the XCode project and what code must be written to enable this feature. For the sake of simplicity, SSO functionality will be added to the AppDelegate that was created by XCode when the app project was created.
First modify the AppDelegate Class.
Step 1. Set the AppDelegate class to handle the Facebook session delegate callback by adding FBSessionDelegate to the list of delegates. For example for the MyGreatIOSApp:
@interface MyGreatIOSAppAppDelegate : NSObject
    <UIApplicationDelegate, FBSessionDelegate>
Step 2. Set up the AppDelegate header file by creating instance variable:
Facebook *facebook;
Step 3. Add a property for an instance of the Facebook class:
@property (nonatomic, retain) Facebook *facebook;
Then modify the AppDelegate implementation file.
Step 1. Synthesize the facebook property (this creates getter and setter methods):
@synthesize facebook;
Step 2. Within the body of the application:didFinishLaunchingWithOptions: method create instance of the Facebook class using your app id (available from the Developer App):
facebook = [[Facebook alloc] initWithAppId:@"YOUR_APP_ID"];
This instance is used to invoke SSO, as well as the Graph API and Platform Dialogs from within the app.
Step 3. Once the instance is created, check for previously saved access token information. (We will show you how to save this information in Step 6.) Use the saved information to set up for a session valid check by assigning the saved information to the facebook access token and expiration date properties. This ensures that your app does not redirect to the facebook app and invoke the auth dialog if the app already has a valid access_token. If you have asked for offline_access extended permission then your access_token will not expire, but can still get invalidated if the user changes their password or uninstalls your app. More information here.
NSUserDefaults *defaults = [NSUserDefaults standardUserDefaults];
if ([defaults objectForKey:@"FBAccessTokenKey"]
        && [defaults objectForKey:@"FBExpirationDateKey"]) {
        facebook.accessToken = [defaults objectForKey:@"FBAccessTokenKey"];
        facebook.expirationDate = [defaults objectForKey:@"FBExpirationDateKey"];
}
Step 4. Check for a valid session and if it is not valid call the authorize method which will both signin the user and prompt the user to authorize the app:
if (![facebook isSessionValid]) {
    [facebook authorize:nil delegate:self];
}
Step 5. Add the application:handleOpenURL: method to the AppDelegate with a call to the facebook instance:
- (BOOL)application:(UIApplication *)application handleOpenURL:(NSURL *)url {

    return [facebook handleOpenURL:url];
}
This method is called by iOS when the Facebook App redirects to the app during the SSO process. The call to Facebook::handleOpenURL: provides the app with the user's credentials.
Step 6. Implement the fbDidLogin method from the FBSessionDelegate implementation. In this method you will save the user's credentials specifically the access token and corresponding expiration date. For simplicity you will save this in the user's preferences - NSUserDefaults:
- (void)fbDidLogin {
    NSUserDefaults *defaults = [NSUserDefaults standardUserDefaults];
    [defaults setObject:[facebook accessToken] forKey:@"FBAccessTokenKey"];
    [defaults setObject:[facebook expirationDate] forKey:@"FBExpirationDateKey"];
    [defaults synchronize];

}

The last thing that needs to be accomplished to enable SSO support is a change to the .plist file that handles configuration for the app. XCode creates this file automatically when the project is created. A specific URL needs to be registered in this file that uniquely identifies the app with iOS. Create a new row named URL types with a single item, URL Schemes, containing a single value, fbYOUR_APP_ID (the literal characters fb followed by your app id). The following shows exactly how the row should appear in the .plist file:

That is it. SSO is ready to go. All that remains is to build and debug the app to ensure anything is setup up correctly. When the app starts in the emulator, you should see the following dialog:

This screen is known as the user authorization dialog. It allows the user to grant your app permission to access their information. If the user presses Allow, your app is authorized and you will have access to the user's profile and social graph through the facebook instance. If the user presses Don't Allow, your app is not authorized and you will not have access to the user's data.
By default, the user is asked to authorize the app to access basic information that is available publicly or by default on Facebook. If your app needs more than this basic information to function, you must request specific permissions from the user. This is accomplished by passing a NSArray of permissions to the authorize method. The following example shows how to ask for access to user's email address and their news feed:
NSArray* permissions =  [[NSArray arrayWithObjects:
     @"email", @"read_stream", nil] retain];

[facebook authorize:permissions delegate:self];

A full list of permissions is available in our permissions reference. There is a strong inverse correlation between the number of permissions your app requests and the number of users that will allow those permissions. The greater the number of permissions you ask for, the lower the number of users that will grant them; so we recommend that you only request the permissions you absolutely need for your app.
Calling the Graph API
The iOS SDK provides a straightforward set of methods to access the Graph API and the Legacy REST API:
//get information about the currently logged in user
[facebook requestWithGraphPath:@"me" andDelegate:self];

//get the logged-in user's friends
[facebook requestWithGraphPath:@"me/friends" andDelegate:self];

//call a legacy REST API
NSMutableDictionary* params = [NSMutableDictionary
     dictionaryWithObjectsAndKeys: @"4", @"uids", @"name", @"fields", nil];

[facebook requestWithMethodName: @"users.getInfo"
    andParams: params andHttpMethod: @"GET" andDelegate: self];
These methods are called asynchronously and require that the delegate passed to the above methods implement the FBRequestDelegate protocol, specifically the request:didLoad: method for successful requests and request:didFailWithError method for errors.
Displaying Platform Dialogs
The iOS SDK provides the dialog method to display Platform Dialogs within the context of your app. Simply pass in the name of the dialog to display along with a delegate to handle the result. The delegate must implement the FBDialogDelegate protocol. The following example displays the Feed Dialog:
[facebook dialog:@"feed" andDelegate:self];

Android
Before you begin development with the Facebook Android SDK, you will need to install the Android SDK and dev tools, Git (the source control client we use for this SDK) and then clone the lastest version of the SDK from GitHub:
- Install Android SDK & the Eclipse Plugin
- Install Git
- Clone the GitHub repository:
git clone git://github.com/facebook/facebook-android-sdk.git
Once you have everything installed, open Eclipse and create a new Android Project (File | New | Project ...). We will use this project for the Facebook Android SDK source and then reference it from our app. As such, we need to get the content by selecting Create project from existing source and specifying the facebook directory from your git repository (~/facebook-android-sdk/facebook).

With the SDK project created, we can create the app. Create a new Android Project (the Facebook SDK project will stay open in the Eclipse Workspace) from File | New | Project..., using the defaults and populating the require fields.

Once your app project is created, you will need to add a reference to the Facebook SDK project. You do this by opening the properties window for our app (File | Properties), selecting the Android item from the list, pressing the Add... button in the Library area and selecting the Facebook SDK project created above.

Once the Facebook SDK is referenced, the app manifest needs to be modified to allow the app to make network calls to Facebook. This is accomplished by adding the following to the AndroidManifest.xml file in the app project:
<uses-permission android:name="android.permission.INTERNET">
</uses-permission>

We now need to export the signature for your app so that Facebook can use to ensure users are only communicating with your app on the Android. This is done by running the keytool. The following shows how to export the key for your app using the debug defaults specified by the Android SDK and Eclipse:
keytool -exportcert -alias androiddebugkey -keystore ~/.android/debug.keystore
| openssl sha1 -binary
| openssl base64
This tool generates a string that must be registered in the Mobile & Devices section of the Developer App for your app:

Installing the Facebook Android App
To help with debugging your app in the Android emulator, we provide a binary image of the Facebook Android that you can install with the adb tool in the Android SDK.
adb install ~/facebook-android-sdk/Facebook.apk
Your app will still work without installing this image, but we will default to using Platform Dialogs for sign-in rather than using the Facebook App requiring you to sign-in every time you run your app in the emulator.
Single-Sign-On (SSO)
As with the iOS SDK, one of the most compelling features of the Android SDK is Single-Sign-On (SSO). SSO lets users sign into your app using their Facebook identity. If they are already signed into the Facebook Android app on their device they do not have to even type a username and password. Further, because they are signing to your app with their Facebook identity, you will have access to their profile information and social graph.
Adding SSO to your app is very simple with the Facebook SDK. The below example outlines what code must be written to enable this feature. For the sake of simplicity, SSO functionality will be added to the Activity that was created by Eclipse when the app project was created:
package com.greatap;

import android.app.Activity;
import android.content.Intent;
import android.os.Bundle;
import com.facebook.android.*;
import com.facebook.android.Facebook.*;

public class MyGreatActivity extends Activity {

    Facebook facebook = new Facebook("YOUR_APP_ID");

    @Override
    public void onCreate(Bundle savedInstanceState) {
        super.onCreate(savedInstanceState);
        setContentView(R.layout.main);

        facebook.authorize(this, new DialogListener() {
            @Override
            public void onComplete(Bundle values) {}

            @Override
            public void onFacebookError(FacebookError error) {}

            @Override
            public void onError(DialogError e) {}

            @Override
            public void onCancel() {}
        });
    }

    @Override
    public void onActivityResult(int requestCode, int resultCode, Intent data) {
        super.onActivityResult(requestCode, resultCode, data);

        facebook.authorizeCallback(requestCode, resultCode, data);
    }
}
When the above Activity is built and run as part of your app, you will prompted with the user authorization dialog:

This dialog allows the user to grant your app permission to access their information. If the user presses Allow, your app is authorized and you will have access to the user's profile and social graph through the facebook instance. If the user presses Don't Allow, your app is not authorized and you will not have access to the user's data.
By default, the user is asked to authorize the app to access basic information that is available publicly or by default on Facebook. If your app needs more than this basic information to function, you must request specific permissions from the user. This is accomplished by passing String[] of permissions to the authorize method. The following example shows how to ask for access to user's email address and their news feed:
facebook.authorize(this, new String[] { "email", "read_stream" },

      new DialogListener() {
           @Override
           public void onComplete(Bundle values) {}

           @Override
           public void onFacebookError(FacebookError error) {}

           @Override
           public void onError(DialogError e) {}

           @Override
           public void onCancel() {}
      }
);

A full list of permissions is available in our permissions reference. There is a strong inverse correlation between the number of permissions your app requests and the number of users that will allow those permissions. The greater the number of permissions you ask for, the lower the number of users that will grant them; so we recommend that you only request the permissions you absolutely need for your app.
Calling the Graph API
The Android SDK provides a straightforward set of methods to access the Graph API and the Legacy REST API:
// get information about the currently logged in user
facebook.request("me");
//get the logged-in user's friends
facebook.request("me/friends");

//call a Legacy REST API method
Bundle parameters = new Bundle();
parameters.putString("method", "auth.expireSession");
String response = request(parameters);
These methods are called synchronously and will block the UI, so we recommend that calling this in a separate thread and then marshal the results back to the UI thread. The Facebook SDK provides a class, AsyncFacebookRunner, that you can utilize for this purpose.
Displaying Platform Dialogs
The Android SDK provides the dialog method to display Platform Dialogs within the context of your app. Simply pass in the name of the dialog to display along with a delegate to handle the result. The following example displays the Feed Dialog:
facebook.dialog(this,"feed",

      new DialogListener() {
           @Override
           public void onComplete(Bundle values) {}

           @Override
           public void onFacebookError(FacebookError error) {}

           @Override
           public void onError(DialogError e) {}

           @Override
           public void onCancel() {}
      }
);
Mobile Web
The mobile web is an important and growing focus area for Facebook Platform. Most of our desktop web technologies apply to the mobile web, making Facebook for Websites is the best place to get started. The following sections highlight how to use the JavaScript SDK and our Platform Dialogs directly to handle user login and news feed publishing.
User Login
Because of the display limitations of mobile devices, Facebook Platform provides special support within our Platform Dialogs for user login on mobile devices. If you are using the our JavaScript SDK, the correct dialog for the user's device will be rendered automatically.
The JavaScript SDK requires that you register your website with Facebook to get an App ID (or appId). The appId is a unique identifier for your site that ensures that we have the right level of security in place between the user and your website. The following example shows how to load the JavaScript SDK using your appId and add the Login Button to your page using the <fb:login-button> XFBML element:
 <html>
    <head>
      <title>My Facebook Login Page</title>
    </head>
    <body>
      <div id="fb-root"></div>
      <script src="http://connect.facebook.net/en_US/all.js"></script>
      <script>
         FB.init({
            appId:'YOUR_APP_ID', cookie:true,
            status:true, xfbml:true
         });
      </script>
      <fb:login-button>Login with Facebook</fb:login-button>
    </body>
 </html>
When this page is loaded into your mobile browser it will render the login button. When the user selects the login button, they will be prompted to authenticate and authorize your site:


If you would rather use the OAuth Dialog directly, you can use the parameter display to specify that you would like to render a mobile version of the dialog. There are two options for display relevant to mobile web apps:
wapfor feature phones and older mobile Web browserstouchfor smartphone and tablets with full featured Web browsers
To authenticate a user and have them authorize your site using the WAP-friendly OAuth Dialog, redirect the user to the following URL:
http://www.facebook.com/dialog/oauth?
    client_id=YOUR_APP_ID&redirect;_uri=YOUR_URL&display;=wap

For a touch view of the same dialog suitable for display in iOS and Android devices, specify the touch value in the display parameter:
http://www.facebook.com/dialog/oauth?
    client_id=YOUR_APP_ID&redirect;_uri=YOUR_URL&display;=touch

News Feed Publishing
As with user login, Facebook Platform provides special support within our Feed Dialog to enable mobile web apps to publish into the News Feed. The current version of the JavaScript SDK does not yet supporting automatically selecting the correct dialog for the user's device. We expect to add this capability shortly.
To display a mobile-friendly Feed Dialog, redirect the user to the following URL:
http://www.facebook.com/dialog/feed?
    client_id=YOUR_APP_ID&redirect;_uri=YOUR_URL&display;=touch

Next Steps
This was a quick survey of building mobile apps/site using Facebook Platform. If you are looking to add deeper personalization to your mobile app/site, exploring the Graph API is the right next step. If you are looking to leverage the different channels that your user can interact with their friends from your app/site, see our Social Channel.