Table of Contents
This has got to be one of the most frustrating things when you own a Chromebook.
In this scenario, you’re in a virtual meeting, and you have a question. You start to ask but no one is answering you. They don’t even acknowledge you.
Even though your mic is on, you start to realize that it’s not the speaker’s fault, it’s not the participants, it’s not even you. It’s your Chromebook’s microphone. Something’s wrong with it and you need to fix it.
Well, you’re in luck. I’m going to go into particularly every single possible solution that currently exists starting from the most popular to the least.
Let’s get right into it!
Your microphone sensitivity is too low
I hate to admit this, but this exact same thing happened to me.
I started in my microphone settings testing out my mic. I started yelling at my Chromebook and realized that there was a glimpse of response from my colleagues on the other side of a Google Meet.
This was when I realized that my microphone sensitivity was way too low.
Thankfully, this is one of the most common issues and one of the easiest to fix.
How to increase microphone sensitivity
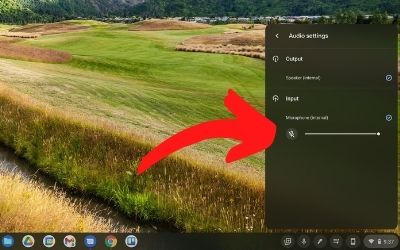
- On your Chromebook desktop, click on the bottom right clock to bring up quick settings.
- Click on the right arrow to the right of the sound option.
- Look for Input > Microphone.
- Drag that microphone bar further to the right to increase sensitivity.
The video conferencing tool is not using your mic
This may sound a little weird, but if you’re using a video conferencing tool like Google Meet, Zoom, Microsoft Teams, etc. There’s a good chance the reason your mic won’t work is because that app doesn’t have your mic as default.
Fixing this is easy.
Just understand one thing, the microphone setting in your Chromebook’s quick settings is not synced to the microphone settings in your video conferencing app. They are independent of each other. So, turning one on or setting a specific microphone as the default will not turn the other one on as well.
So what does this mean? It means that you have to make sure both your Chromebook settings are fixed to the correct mic as well as the video conferencing app you’re using is fixed to the correct mic.
You have to do it manually.
I also want to mention that this is more or less for people who have an external microphone and want to use it instead of the one that’s built-in to most Chromebooks.
How to make your microphone the default in Google Meet
- While in a video meeting, go to the bottom right of the Google Meet window and click on the 3 vertical setting dots.
- Click on Settings.
- On the audio tab, and under Microphone, change the default microphone you want to use.
How to make your microphone the default in Zoom
- While in a video meeting, go to the bottom left where you’ll find a microphone icon.
- Click on the arrow next to it pointing up.
- Under Select a Microphone, click on the microphone you wish Zoom to use.
How to make your microphone the default in Microsoft Teams
- While in a video meeting, go to your floating menu bar and click on the 3 horizontal option dots.
- Click on Show device settings.
- Under Microphone, select the microphone you want to use.
How do I allow websites or apps to access my microphone?
The next culprit in the picture could be the permissions feature.
The permissions option is a security measure set in place so that you as the owner have control over exactly which apps or websites can activate your microphone or even camera.
Sometimes, you might even see a pop-up window on the top left asking for your permission to use your camera or microphone when it needs.
And sometimes, it’s entirely possible that you’ve denied that access by mistake or intentionally.
But how do you go into those settings and allow access?
Let’s talk about that.
Before we go any further, I want to warn you that you should only allow access to your camera and microphone only if you really trust the site. Video conferencing apps like Google Meet, Zoom and Microsoft Teams are among the most popular and yes, they are all trustworthy.
How to enable permissions to allow microphone access
- While in the Google Chrome browser, click on the 3 vertical options dot at the top right.
- Click on Settings > Privacy and security > Site Settings.
- Under Permissions, click on Microphone.
- Click on any of the mistakenly blocked sites and allow.
Here, you can also change the default mic here in this window.
This is a list of apps you’ve either blocked because you didn’t trust them, or agreed to for me and my family.
Disable extensions
This method has actually been recommended by several groups of people in Chromebook forums.
What you want to do is disable one extension at a time while testing the microphone after every disable.
The idea is that one or even two of these extensions are somehow interfering with your built-in or external microphone. And by disabling this extension, and testing if your microphone works, you’ll be able to find the culprit extension causing the heartache.
Sometimes, it’s a combination of extensions and this makes it even harder to find. You may even end up disabling all your extensions and ultimately not know which ones actually caused it.
This method requires a ton of trial and error to see whether 1 or more extensions are the root of the problem.
How to disable extensions on a Chromebook
- While on the Chrome browser, click on the 3 vertical option dots.
- Click on More tools > Extensions.
- Toggle off each extension or app one at a time.
- After every toggle-off, turn on a video conference and test to see if your microphone is working.
Use Guest mode
If you want to just find out if your microphone’s not working due to anything regarding your personal account, you can try to use guest mode.
In guest mode, it’s like you’re using a fresh install of ChromeOS. There are no apps, no extensions, and no altered settings in guest mode.
While in guest mode, you are looking at the foundation of ChromeOS, unadulterated.
This method is more of a way of checking.
If you find yourself in Guest mode and able to use the microphone perfectly fine, then it’s pretty obvious that it could be the extensions, apps, or settings involved.
This will allow you to, at least, cross out hardware as an issue.
How to log into Guest mode while logged in with your personal account
- Go to the bottom clock and click on it to open up your quick settings.
- Click on Sign out.
- At the bottom of the screen, click on Browse as a Guest.
- Log into a video conference to see if you can use your microphone.
Try using an external microphone
It’s important to understand that maybe it could be a hardware issue.
If your built-in mic isn’t working, you’ll be able to confirm this by using an external mic. By using an external mic, you’ll be able to cross out the possibility that it’s a software issue. If the external mic doesn’t work, it’s a strong indication that the problem lies with the software.
If the external mic does work, then there might not be any other explanation, other than the fact that the built-in mic may have physically failed.
This is usually automatic and ChromeOS automatically sets the external mic as default, but if it doesn’t occur, you can follow the steps above on the video conferencing tool and the permissions menu.
Just make sure both the ChromeOS audio settings and the video and audio conferencing tools are pointing to the same external mic instead of the built-in mics.
One thing I want to point out is to try and unplug and plug the external mic back in to give it a reset. Sometimes, that works.
Try a different video conferencing software
Sometimes, it may just be the software you’re using that’s having issues with connecting to the drivers that control your microphone.
One suggestion is to try testing your microphone within another communications software. There are plenty to choose from.
Some of the more popular ones are:
- Zoom
- Skype
- Google Meet
- Google Classroom
- GoToMeeting
- Microsoft Teams
- Google Duo
- And more…
If the problem is with specific software, then it’s important that you reach out to the company let them know the situation. Sometimes certain bits of hardware like the microphone require updated software to work properly.
Try a beta channel
This isn’t always recommended because beta channels are not stable.
However, beta channels exist sometimes to solve issues with stable channels, and perhaps this is one of the issues that a beta channel seeks to solve.
But before thinking about doing this, just know that it will wipe your hard drive and all your data.
This isn’t something you want to just try out if you haven’t already backed up all your files and data.
Don’t worry about things stored on Google, those things are safe.
If anything is saved locally in a folder located inside your Chromebook, you may want to back it up before changing to a beta channel.
How to activate a beta channel
- While on your Chromebook, go to open up quick settings from the bottom right clock.
- Click on the Gear icon.
- Click on About Chrome OS.
- Click on Additional details.
- Click on Change channel.
- Select Beta.
Powerwash it
I normally leave this for last because it’s the least popular option.
Who wants to completely factory restore their computer?
A Powerwash basically deletes everything on your Chromebook. It’s what you do when you want to sell your Chromebook to someone and you want to completely remove all traces of your existence from its memory.
I would only recommend this method if you’ve tried at least the top 3 methods I’ve mentioned above.
How to Powerwash a Chromebook
- Click on the clock to open your quick settings.
- Click on the gear icon.
- Click on Advanced.
- Click on Reset settings.
- Click on Reset.
What to do when the mic doesn’t work because of faulty hardware
Well, this is probably the worst news you can find when it comes to microphones.
All electronics fail. Even if it’s brand new, there’s no guarantee that all components of a computer will always work.
Hopefully, if you’re still in the warranty window, which manufacturers offer a year of, you will be able to simply call the company and request a repair or replacement.
The other issue is that most companies won’t send you a new one while your current one is being required or evaluated. You might be stuck for a week or so without a computer. So, keep that in mind and plan ahead.
Here’s an interesting thing you might not have known. If your warranty is a few days from expiring, and you’ve just gotten your device repaired or replaced (this is true for most manufacturers), you will receive an additional 3 months of warranty for that repaired or replaced item.
A hardware failure isn’t something you can solve on your own.
The bottom line
There are several ways to fix your microphone problem on a Chromebook.
A microphone that’s not working on a Chromebook can have a number of reasons. It could be interference from other software. It could be your specific settings. It could even be that the sensitivity is turned down too low.
Regardless of the fact, it’s important to know that there are several methods to solve a non-working microphone on a Chromebook.
FAQ
Where’s the microphone located on a Chromebook?
You can easily find the microphones on your Chromebook by looking for small pinholes all over your Chromebook. These pinholes are so small it the only things that can fit into it would be a sewing needle. If you find a locate one with a similar description, chances are, you’ve found it. A Chromebook will have an average of 2-3 microphones located on and around its surface.
How do I test my microphone on a Chromebook?
Testing your Chromebook’s microphone can easily be done by bringing up a Google Meet. Google Meet has a mic sound indicator that will allow you to be able to test your mic and see if it’s working properly. Simply join or create a Google Meet here. Then start talking and watch for the green speaking indicator to jump with every sound you make.
How do I unblock the microphone on my Chromebook?
There are 2 steps you need to take. First, open up your quick settings, click on the arrow icon next to speaker gauge, Then, under Input, click on the microphone icon to toggle it on and off. The next step is with whatever voice or video program you use, go into its settings, look for the app’s microphone settings and turn it on or off as well. Make sure both steps match with both being on in order to use the microphone on your Chromebook. If one or both are off, your mic will not work.
How can I tell if my Chromebook has a built-in microphone?
If you find some pinholes on your Chromebook, chances are, this is a built-in microphone. Some microphones are usually found close to the camera. While others are spread out throughout the Chromebook for even sound capturing. These microphone pinholes can be found anywhere on your laptop, but can mostly be found somewhere along the keyboard, on the display screen and even on the side of the Chromebook where all the ports are.
How do I improve my Chromebook microphone quality?
We can discuss this in a whole different article. But in summary:
- Talk at the right distance from your Chromebook.
- Don’t talk directly into the mic.
- Don’t speak too loudly or quietly.
- Use an external microphone.
- Talk in a quiet room without a lot of background noise.
Other interesting articles: